Kleanstrip Easy Liquid Sander to Clean Brushes
How to Refinish Kitchen Cabinets: Part 1
Refinishing kitchen cabinets is an excellent frugal alternative to installing new cabinets, which can cost thousands of dollars (say what?!). While I won't lie to you–this is a time-consuming endeavor–it yields a major impact and isn't difficult! It's such an inexpensive alternative to completely renovating a kitchen and you could get creative with colors. This is probably my favorite frugal home improvement. We went with white because we already have grey walls and a green backsplash and I didn't want to end up with unicorn colors.
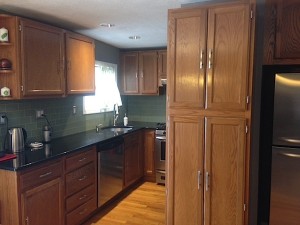
Sad Before 🙁
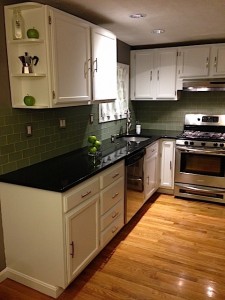
Joyous After!
I split the project into 2 posts:
-
Part 1 (that's this one!): the prep
-
Part 2: the paint
Total Cost: $183.45
Supplies:
- Screwdriver or drill
- Masking tape
- Permanent marker
- De-greaser:
- We used Klean Strip TSP Substitute
- Liquid sander/de-glosser
- We used Klean Strip Easy Liquid Sander Deglosser
- Disposable latex gloves
- Box cutter
- Painter's tape:
- Frugal tip: it's expensive. Don't buy it unless you really need it.
- Drop cloths:
- Frugal tip: use paper grocery sacks
- Caulk
- 220 grit sandpaper
- Primer:
- We used Stix Urethane Acrylic Waterborne Bonding Primer
- Paint:
- We used Benjamin Moore Advance Paint in "Super White"
- Paintbrushes:
- Fine nap small rollers (this was a good purchase–provides a smooth finish)
- Regular brushes (needed these for cutting-in the edges)
- Personal paint cup:
- Frugal tip: use old plastic food containers.
- Rags:
- Frugal tip: we cut old t-shirts into rags.
How To:
Step 1: Empty out the cabinets.
- We found it easiest to remove everything from the cabinets so that we weren't worried about getting paint on plates and the like.
- Bonus: fun time to re-organize your cabinets!
Step 2: Remove hardware from cabinets.
- Our cabinets and drawers have identical handles, so there was no need to label what went where.
- If you do have different handles and knobs, you'll want to label each one.
- Frugal tip: hardware is gigantically expensive, so if you can re-use your existing hardware as we did, you'll save a bundle. If you hate the color of your hardware, you could spray paint it as I did in one of my furniture refinishing projects.
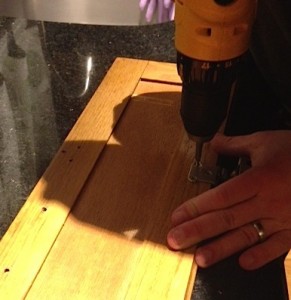
Remove hardware with a screwdriver or drill
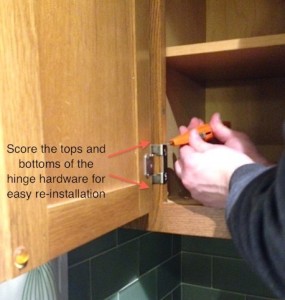
Step 3: Score tops and bottoms of all hinge hardware.
- Before you remove the cabinet doors, use a box cutter to score the wood at the tops and bottoms of the hinge hardware for each door.
- This makes it easy to align your hinges when re-installing.
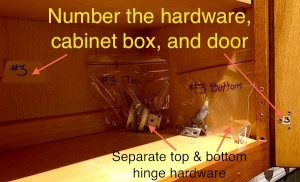
Step 4: Label all cabinet boxes, cabinet doors, and hinge hardware.
and
Step 5: Remove cabinet doors.
- You'll be tempted to yank all the doors off ASAP, but wait! I promise you won't regret carefully labeling each one. Remember, you have to reverse engineer this project in order to get the doors back ON when you're done.
- After you've scored each hinge (see step 3), remove the hinges using a screwdriver and place hardware in separate labeled ziplock bags for top and bottom hinge hardware (initially I planned on doing a cutesy labeling system using song lyrics (?!?), but Frugal Husband gently pointed out it'd be easiest to just use numbers. Sigh.).
- Next, label the corresponding cabinet box (fancy name for the cabinet itself) with the same number as the corresponding hinge hardware. My high-tech system involved masking tape and a marker.
- Then, label the corresponding cabinet door with the same number as its hinge hardware and cabinet box. Since you're painting all parts of the cabinet door, one must be a bit creative in how one labels:
- Write the number on the door itself underneath the spot that's covered by the hinge hardware.
- Use a tiny piece of masking tape, with the number written on it, to cover the number up. That way, you can roller paint over the masking tape and later remove it to reveal the number underneath.
- Woe betides the painter who paints over her cabinet door number.
- Let me just tell you: once you get those doors off, it is REALLY unclear which door goes where and also which end is up… no joke.
- I wrote a lot in this step for a reason: you realllllly don't want to fumble around with hinge hardware and doors after you've done the hard work of painting. You want to reinstall the dang things and take your after photos. So, do your future self a solid and label like a fiend.
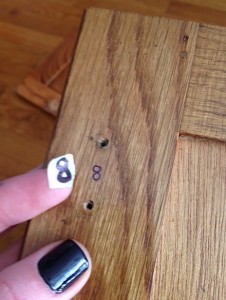
Cover numbers with numbered tape
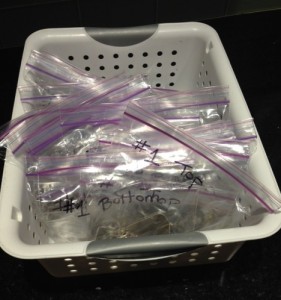
Keep track of all your hardware!
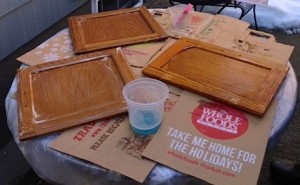
Step 6: Set up your work stations.
- You will be a happier little camper if several people work on this project. Since the cabinet doors are mobile after they're removed, you can run zone defense (omg sport metaphor!) and divide up the labor.
- Here are the work stations we set up:
- Outdoors (on our patio): cabinet door cleaning
- Upstairs office: cabinet door & drawer painting studio
- Upstairs bedroom: cabinet door & drawer drying studio
- Kitchen itself: bet you'll never guess…the cabinet boxes 'cause they don't move
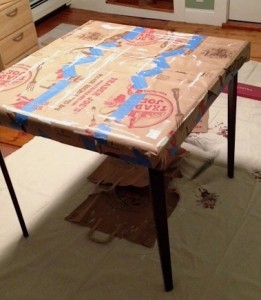
Table used for painting doors and drawers
Step 7: Determine the scope of your painting.
- Frugal Husband and I, being both lazy and pragmatic, decided not to paint the interior of our cabinet boxes or drawers. Our interiors are a light-colored wood and we decided it doesn't bother us.
- This choice is entirely yours and if you do paint your interiors, you'll need to allot more time for painting.
- We do recommend you paint all four sides of your cabinet doors. Let me break it down for you: it would look straight-up tacky if you didn't.
- Frugal tip: you'll use less paint if you don't paint the interiors.
Step 8: Tape and drop cloth your kitchen.
- Since we weren't changing our backsplash, floors, appliances or countertops, we did not want to spill paint! And, as previously disclosed, I am a freaking messy painter.
- I used painter's tape to meticulously (read: mind-numbingly) tape around every cabinet box (walls, backsplash, oven hood)–whatever touched a cabinet that wasn't another cabinet got taped.
- I covered the kitchen floor and countertops with paper grocery sacks.
- Frugal tip: taping and covering surfaces ensures you won't incur costly clean-up projects.
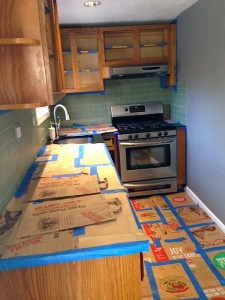
Tape and cover it all!
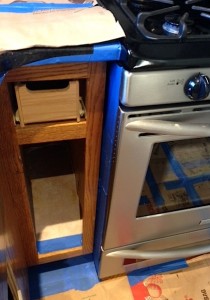
Tape appliances carefully to avoid paint splatter

If you're not painting the interiors, use tape to avoid splotches
Step 9: Clean cabinets, drawers, and doors with a liquid de-greaser.
- I recommend TSP Substitute.
- This step is vital with kitchen cabinets since they accumulate cooking and hand grease from frequent use.
- We wore disposable latex gloves and carefully poured a bit of TSP Substitute onto rags and then rubbed it onto the cabinets to clean them. Wipe in a circular motion over all surfaces (think: wax on, wax off).
Washing doors with TSP Substitute
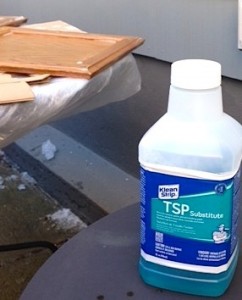
TSP Substitute Selfie
Step 10: Use a liquid sander/de-glosser to remove finish on cabinets, drawers, and doors.
- This stuff is pretty nasty, but, it works miracles. MIRACLES.
- Definitely wear gloves and open all the windows and doors for ventilation! Hounds should run for cover.
- Pour a small amount onto a rag and then go to town on the cabinet boxes, drawers, and doors.
- This was so effective we didn't need to sand with sandpaper–the liquid sander removed plenty of the top layers of finish and gloss. Like it said: do you believe in miracles?
Step 11: Let the liquid sander/de-glosser dry.
- Don't wipe it off with water or anything, just let it air dry. Completely.
Congrats, you're ready for
Part 2!
Never Miss A Story
Sign up to get new Frugalwoods stories in your email inbox.
Success!
You may also like...
Source: https://www.frugalwoods.com/2014/05/03/how-to-refinish-kitchen-cabinets-part-1/
0 Response to "Kleanstrip Easy Liquid Sander to Clean Brushes"
Post a Comment